Stunning Ways to Elevate Any Drip Cake
Pink Drip Cake : Stunning Ways to Elevate Any Drip Cake
Introduction
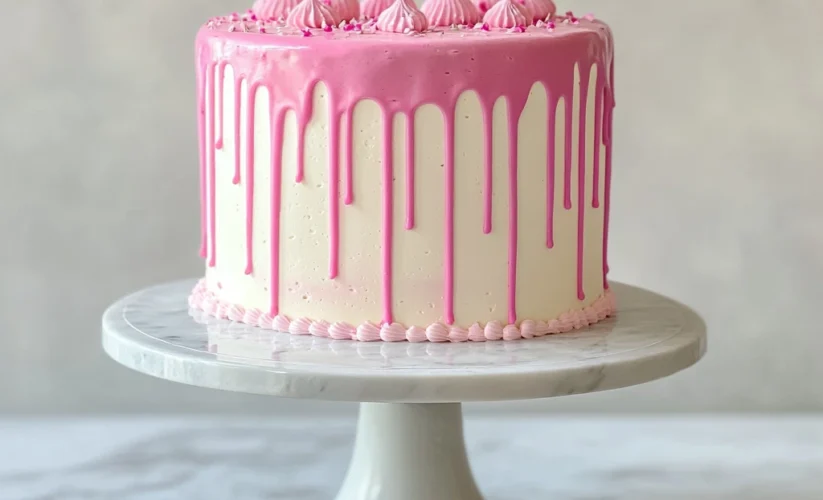
As a passionate baker, there’s something truly magical about creating a show-stopping Pink Drip Cake that not only tastes divine but looks absolutely captivating. This delightful confection has quickly become a favorite among both home bakers and professional pastry chefs alike, thanks to its stunning appearance and delicious flavor profile.
Originating from the modern cake decorating trend, Pink Drip Cake embodies the perfect marriage of elegance and whimsy. The vibrant pink drips cascading down the sides of a luscious cake create a visually striking effect that never fails to impress both the young and the young at heart.
Whether you’re celebrating a special occasion or simply indulging your sweet tooth, the Pink Drip Cake is a versatile dessert that can easily be customized to suit any theme or flavor preference. Its popularity lies in the balance of simplicity and sophistication, making it an ideal choice for those looking to add a touch of glamour to their baking repertoire.
If you’re eager to elevate your baking skills and wow your guests with a standout dessert, follow us to discover more recipes that I’ve curated with love and expertise. Let’s dive into the world of Pink Drip Cakes and discover the joy of creating edible works of art!
Table of Contents
Ingredients for Pink Drip Cake
List of Ingredients for 4 Servings:
- 3 cups all-purpose flour
- 2 1/2 teaspoons baking powder
- 1/2 teaspoon salt
- 1 cup unsalted butter, softened
- 2 cups granulated sugar
- 4 large eggs
- 2 teaspoons vanilla extract
- 1 cup whole milk
- Pink food coloring
- White chocolate ganache
- Sprinkles or edible decorations
Ingredient Substitution Options:
If you prefer, you can use cake flour instead of all-purpose flour for a lighter texture. You can also substitute almond or soy milk for whole milk if you have dietary restrictions.
Quality Tips:
Ensure all ingredients are at room temperature for a smoother batter. Sift the dry ingredients to avoid lumps in the cake. Use gel food coloring for a vibrant and consistent pink color.
Health Benefits:
This cake provides energy from carbohydrates, protein from eggs, and a source of calcium and vitamin D from milk. Modifying ingredients for dietary needs can make it suitable for various lifestyles.

Step-by-Step Instructions
Preparation:
- Preheat the oven to 350°F (180°C) and grease and flour three 8-inch round cake pans.
- In a medium bowl, whisk together the flour, baking powder, and salt. Set aside.
- In a large mixing bowl, cream the butter and sugar until light and fluffy.
- Add eggs one at a time, beating well after each addition. Stir in the vanilla extract.
- Gradually add the dry ingredients to the wet ingredients, alternating with the milk, and mix until smooth.
- Add pink food coloring to achieve the desired shade and mix well.
- Divide the batter evenly among the prepared cake pans.
Cooking:
- Bake the cakes for 25-30 minutes or until a toothpick inserted into the center comes out clean.
- Let the cakes cool in the pans for 10 minutes before transferring to a wire rack to cool completely.
- Prepare the white chocolate ganache by melting white chocolate and cream until smooth.
- Stack and frost the cake layers with ganache, creating a smooth finish.
- Add drips of pink ganache around the edges of the cake for a decorative effect.
- Decorate with sprinkles or edible decorations of your choice.
Tips:
Level the cake layers before assembling to create a stable base. Chill the cake after frosting for easier decorating. Use a squeeze bottle for precise drip placement.
Common Mistakes to Avoid:
Avoid overmixing the batter to prevent a dense cake. Ensure the ganache is at the right consistency for drips. Allow the cakes to cool completely before frosting to prevent melting.
Pro Tips for Best Results
1. Use Gel Food Coloring:
For a vibrant and consistent pink color in your drip, opt for gel food coloring instead of liquid ones.
2. Properly Chill Your Cake:
Make sure your cake is completely chilled before adding the drip to prevent it from running too quickly.
3. Thin Out Your Drip:
If your drip is too thick, gently heat it in short bursts in the microwave to achieve the right consistency for that beautiful dripping effect.
Storage and Preservation Advice
1. Refrigeration:
Store your Pink Drip Cake in the refrigerator to maintain its freshness and to prevent the drip from melting.
2. Covering:
Keep your cake covered with a cake dome or plastic wrap to protect it from absorbing unwanted odors from the fridge.
Serving Suggestions
1. Room Temperature:
Before serving, allow the cake to come to room temperature for about 30 minutes for the best taste and texture.
2. Garnishes:
Enhance the presentation by adding sprinkles, edible flowers, or fresh berries on top of the cake.
Pairing Recommendations
1. Beverage Pairing:
Pair your Pink Drip Cake with a glass of champagne or a fruity cocktail for a delightful combination.
2. Ice Cream:
For an indulgent treat, serve your cake with a scoop of vanilla or strawberry ice cream.
Troubleshooting Common Issues
1. Runny Drip:
If your drip is too runny, add more confectioners’ sugar to thicken it up or chill it for a few minutes before applying.
2. Uneven Drip:
To achieve a uniform drip around the edges of the cake, ensure that your drip consistency is just right and apply it starting from the center.
Frequently Asked Questions – Pink Drip Cake
1. Can I substitute the dairy and gluten ingredients in this Pink Drip Cake recipe?
Yes, you can easily make this Pink Drip Cake dairy-free by using plant-based milk (such as almond, soy, or oat milk) in place of regular milk. For a gluten-free version, simply use a gluten-free flour blend instead of all-purpose flour in the recipe. Just make sure to choose a blend that is suitable for baking.
2. What are some common problems that can occur while making a Pink Drip Cake?
One common issue when making a Pink Drip Cake is the ganache being too runny or too thick. To fix this, you can either add more chocolate if it’s too thin or more cream if it’s too thick until you reach the desired consistency. Another problem could be the cake layers not baking evenly. Make sure to rotate the cake pans halfway through baking and check for doneness with a toothpick.
3. Can I make the components of a Pink Drip Cake ahead of time?
Yes, you can definitely make parts of the Pink Drip Cake ahead of time. The cake layers can be baked and stored in an airtight container at room temperature for up to 2 days. The buttercream frosting can be made in advance and refrigerated for up to 3 days. The ganache can also be made ahead and stored in the refrigerator, then warmed up before using for the drip effect.
4. How should I store a Pink Drip Cake?
To store a Pink Drip Cake, cover it loosely with plastic wrap or place it in a cake carrier to prevent it from drying out in the refrigerator. Make sure to consume it within 3-4 days for the best taste and texture. If you need to store it longer, you can also freeze the cake (without the drip) wrapped well in plastic wrap and foil for up to 3 months.
5. Can I modify the Pink Drip Cake recipe to make it vegan-friendly?
Yes, you can make this Pink Drip Cake vegan by using vegan butter, plant-based milk, and egg replacers like flax eggs or applesauce in the cake batter. For the ganache drip, you can use dairy-free chocolate and coconut cream instead of heavy cream. The result will be a delicious vegan-friendly Pink Drip Cake.
Conclusion: Pink Drip Cake Recipe
Brief Summary
In conclusion, the Pink Drip Cake is a feast for the senses, combining visual appeal with delightful flavors.
Delve into the world of whimsical desserts with our Pink Drip Cake recipe. This eye-catching creation combines moist vanilla sponge with smooth buttercream and a dazzling pink ganache drip that will elevate any celebration. Learn essential tips for achieving the perfect drip effect and customizing the cake to suit your style.
Encouragement to Try the Recipe
We invite you to embrace your inner baker and embark on this delicious baking adventure. Whether you’re a novice or experienced baker, the Pink Drip Cake recipe is sure to impress both in taste and appearance. Let your creativity shine as you adorn the cake with your favorite toppings and decorations.
Invitation for Feedback and Sharing
We value your experience and feedback! After trying the Pink Drip Cake recipe, we would love to hear about your baking journey. Share your thoughts, photos, and any modifications you made to make the recipe your own. Your insights can inspire others in the baking community.
Social Media Sharing
Spread the joy of baking by sharing your Pink Drip Cake creation on social media. Tag us in your posts and use the hashtag #PinkDripCake to connect with fellow bakers and enthusiasts. Let’s celebrate the beauty and sweetness of homemade treats together!
Get ready to indulge in a slice of happiness with our Pink Drip Cake recipe. Happy baking!